Using Advanced Custom Fields to Create Personalized Google Maps
by Jason Unger, Founder
Insights / Website Development /
Given all of the Tools We Use posts we’ve written, it’s surprising we haven’t yet touched on Advanced Custom Fields — one of the most powerful and important tools we have in our arsenal.
Long story short (or expect to read about it an upcoming post), Advanced Custom Fields (ACF) allows us to build intuitive custom fields for the themes and sites we develop, including everything from photo galleries and text areas to date pickers and option menus.
It’s a WordPress plugin we literally use in almost every site we build now. It’s powerful, it’s customizable, and it’s easy to use.
One of the coolest field types you can use with ACF is a Google Map. Out of the box, it lets you display a Google Map where the user can enter an address and have it appear on the map.
But there’s a lot of customization you can do, including a map with multiple pins (markers) that display more than one location. Here’s how.
What You Need: ACF and the Repeater Field
Believe it or not, ACF is free out of the box. You can download it here.
(If you’re literally learning ACF for the first time, go read the documentation; you’ll need a basic understanding to go from here.)
In addition to ACF, you’ll need to have the ACF Repeater Field installed. It’s purchasable by itself or with ACF Pro.
Rendering the Google Map requires a bit of Javascript. Create a file called googlemaps.js, and insert this code.
(function($) {

/*
*  render_map
*
*  This function will render a Google Map onto the selected jQuery element
*
*  @type	function
*  @date	8/11/2013
*  @since	4.3.0
*
*  @param	$el (jQuery element)
*  @return	n/a
*/

function render_map( $el ) {

	// var
	var $markers = $el.find('.marker');

	// vars
	var args = {
		zoom		: 16,
		center		: new google.maps.LatLng(0, 0),
		mapTypeId	: google.maps.MapTypeId.ROADMAP
	};

	// create map
	var map = new google.maps.Map( $el[0], args);

	// add a markers reference
	map.markers = [];

	// add markers
	$markers.each(function(){

    	add_marker( $(this), map );

	});

	// center map
	center_map( map );

}

/*
*  add_marker
*
*  This function will add a marker to the selected Google Map
*
*  @type	function
*  @date	8/11/2013
*  @since	4.3.0
*
*  @param	$marker (jQuery element)
*  @param	map (Google Map object)
*  @return	n/a
*/

function add_marker( $marker, map ) {

	// var
	var latlng = new google.maps.LatLng( $marker.attr('data-lat'), $marker.attr('data-lng') );

	// create marker
	var marker = new google.maps.Marker({
		position	: latlng,
		map			: map
	});

	// add to array
	map.markers.push( marker );

	// if marker contains HTML, add it to an infoWindow
	if( $marker.html() )
	{
		// create info window
		var infowindow = new google.maps.InfoWindow({
			content		: $marker.html()
		});

		// show info window when marker is clicked
		google.maps.event.addListener(marker, 'click', function() {

			infowindow.open( map, marker );

		});
	}

}

/*
*  center_map
*
*  This function will center the map, showing all markers attached to this map
*
*  @type	function
*  @date	8/11/2013
*  @since	4.3.0
*
*  @param	map (Google Map object)
*  @return	n/a
*/

function center_map( map ) {

	// vars
	var bounds = new google.maps.LatLngBounds();

	// loop through all markers and create bounds
	$.each( map.markers, function( i, marker ){

		var latlng = new google.maps.LatLng( marker.position.lat(), marker.position.lng() );

		bounds.extend( latlng );

	});

	// only 1 marker?
	if( map.markers.length == 1 )
	{
		// set center of map
	    map.setCenter( bounds.getCenter() );
	    map.setZoom( 16 );
	}
	else
	{
		// fit to bounds
		map.fitBounds( bounds );
	}

}

/*
*  document ready
*
*  This function will render each map when the document is ready (page has loaded)
*
*  @type	function
*  @date	8/11/2013
*  @since	5.0.0
*
*  @param	n/a
*  @return	n/a
*/

$(document).ready(function(){

	$('.acf-map').each(function(){

		render_map( $(this) );

	});

});

})(jQuery);
Call the googlemaps.js file from your page template, as well as this script:
<script src="https://maps.googleapis.com/maps/api/js?v=3.exp&sensor=false"></script>You’ll also need the bit of CSS in your stylesheet.
.acf-map {
	width: 100%;
	height: 400px;
	border: #ccc solid 1px;
	margin: 20px 0;
}

/* fixes potential theme css conflict */
.acf-map img {
   max-width: inherit !important;
}
Once you have this code in your theme, you can display a Google Map.
Adding Markers to a Personalized Map
Here’s how to create a map with custom markers of your choosing.
- Create a Repeater field. For this example, call it “Locations.”
- In that Repeater field, create three sub-fields called Title (text field), Description (textarea field) and Location (Google Map field).
- Save.
In your page template, use this code to display the map.
<?php if( have_rows('locations') ): ?>
  <div class="acf-map">
  <?php while ( have_rows('locations') ) : the_row();
  $location = get_sub_field('location');
  ?>
  <div class="marker" data-lat="<?php echo $location['lat']; ?>" data-lng="<?php echo $location['lng']; ?>">
  <h4><?php the_sub_field('title'); ?></h4>
  <p class="address"><?php echo $location['address']; ?></p>
  <p><?php the_sub_field('description'); ?></p>
  </div>
  <?php endwhile; ?>
  </div>
  <?php endif; ?>
You can adjust the display of the title, address and description however you’d like using CSS. You can also add additional sub-fields to your repeater and display them in the marker.
If you’re looking over the code and wondering exactly how it works – the Google Map field holds the address, latitude and longitude of the location, which can each be displayed individually.
Adding Locations
Once you have the fields and the code built out, you can add the actual Locations to be displayed.
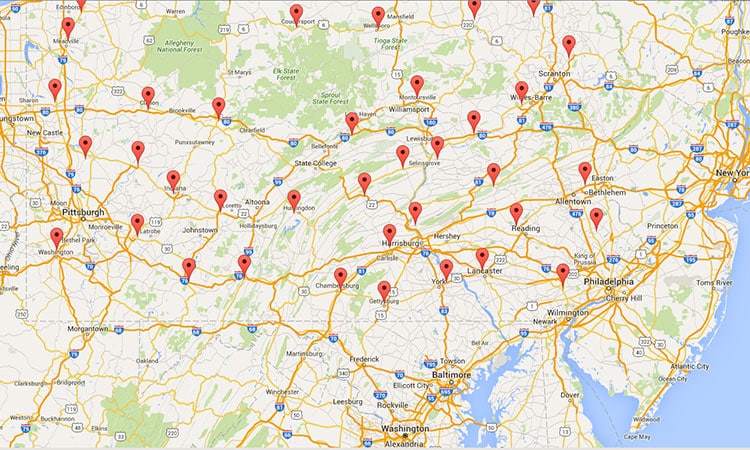
If you’ve done it right, you’ll get a beautiful Google Map with the markers exactly where you’ve placed them.
As an example, you can see the Event Locator we built for the Chesapeake Network.
There are definitely other ways to build a custom Google Map, but if you’re using WordPress and Advanced Custom Fields, this is by far the easiest and most-straightforward.
For more on ACF Google Maps, check out their resources (where most of this code was generated from).
Interested in learning more about customizing Google maps? Check out Building Interactive Google Maps: Styles, Infowindows and Custom Markers to learn more.
About Jason Unger
Jason Unger is the Founder of Digital Ink. He built his first website on Geocities, and hasn't looked back since. Digital Ink tells stories for forward-thinking businesses, mission-driven organizations, and marketing and technology agencies in need of a creative and digital partner.
Other Stories You May Like