Building Interactive Google Maps
by Jason Unger, Founder
Insights / Website Development /
The Google Maps API is incredibly robust, allowing us to build creative and interactive maps and easily integrate them into our websites using Advanced Custom Fields.
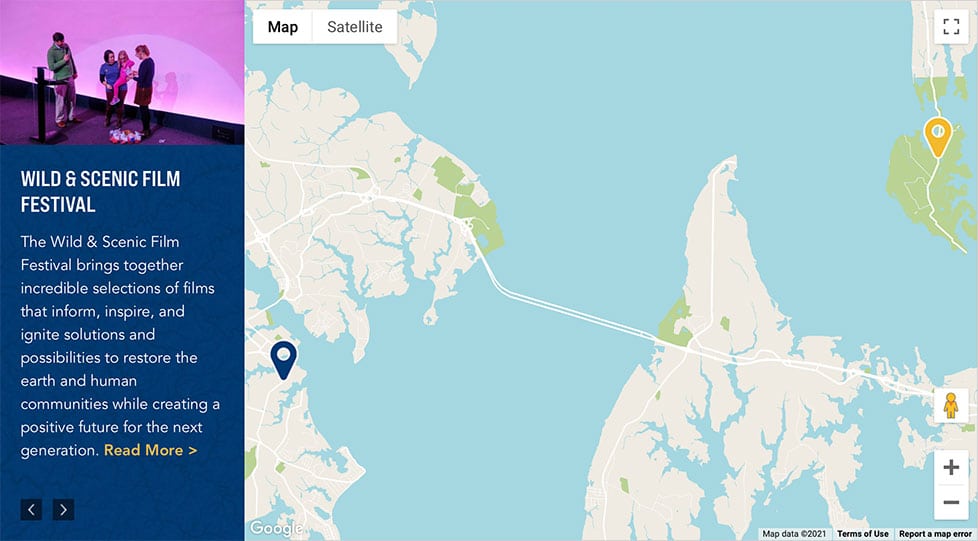
When we redesigned the website for The Alliance for the Chesapeake Bay, one of our goals was to promote more location-based content; as the caretaker for the entire Chesapeake Bay Watershed, it was important to show the Alliance’s work throughout Maryland, Virginia, DC, Pennsylvania and more.
We decided to tackle this goal by promoting multiple types of location-based content, including blog posts about their work and their ongoing and annual in-person events. If it has a geographic location, we put it on a map.
But we didn’t want to just use vanilla, default Google Maps; we wanted to customize the design, use our own markers, and display content better integrated into the site. Here’s how we did it.
Styling Google Maps with Snazzy Maps
Customizing your Google Maps to use different backgrounds, change label colors, toggle the visibility of landmarks, and adjust fonts requires updating your googlemaps.js file, specifically the styles array of arguments used when creating the map.
All of the options are available in Google’s Maps documentation, and they even have a Styling Wizard you can use the visualize your changes. But if you’re looking for something both relatively easy-to-implement and unique, we recommend checking out Snazzy Maps.
Snazzy Maps is a free resource of user-generated map styles, and it has everything from colorful, bold maps to greyscale, dark maps. What’s so cool about the resources from Snazzy Maps is that you can:
- easily take the code from any style and use it
- start with one of their styles and easily adjust some of the settings
- create your own map styles with more specifics than Google’s Stylizing Wizard
For the Alliance website, we had already designed what we wanted the map to look like, so we found a comparable style in the Snazzy Maps library and adjusted the settings to make it match what we have mocked up during our design phase. Given how many options can be customized with each map, it made more sense to start with a foundation and adjust colors and fonts rather than build the arguments from scratch.
Building Infowindows Integrated into the Design
Google Maps have easily-identified Infowindows — the little bubbles that pop up when you click on a location’s marker on the map. The Infowindows usually have content about the location, like the name of the place, perhaps a short description, and a link to read more.
For the Alliance’s redesign, we didn’t want our Infowindows to pop up above each marker. Instead, we wanted the markers to control a dedicated story section to the left of the map. To do this, we had to get creative.
Building the copy and images for each Infowindow uses the same process as detailed here; create a series of markers with latitude and longitude, and in each marker’s div container, add the content you want displayed. But rather than displaying the Infowindow when the marker is clicked, we want to take the content and display it a separate space.
In googlemaps.js, this is the default code that displays the Infowindow when the marker is clicked:
google.maps.event.addListener(marker, 'click', function() {
     infowindow.open( map, marker );
});
Essentially, we’re listening for a click on a marker, and then opening that marker’s Infowindow.
So to make this work with our design, we’re not going to open the Infowindow; we’re instead going to grab the content of that Infowindow and insert it into our content area, a div we’ve given an ID of “map-story”.
google.maps.event.addListener(marker, 'click', function() {
     document.getElementById("map-story").innerHTML = $marker.html();
});
This is an extremely straightforward way to grab your Infowindow content and display it outside of your actual map when a marker is clicked.
Using Custom Markers and Displaying Active Markers
Our design for the Alliance’s map had two additional unique elements: custom markers (map pins) for each location, and different markers depending on the active/clicked location.
We created our markers as 35×50 transparent PNGs, giving us maximum visibility while still being able to see the content behind the marker. To actually add the custom marker graphics, you need to add an “icon” value when creating each marker.
var marker = new google.maps.Marker({
     position : latlng,
     map : map,
     icon : "https://www.allianceforthebay.org/wp-content/themes/acb/img/marker-blue.png",
});
That’s easy. The more difficult part was swapping out the default blue marker for a yellow marker when the location is active and its content is displayed. To do that, we needed some logic.
Going back to our listener on the marker click, we needed to loop through every marker on the map, set its marker to blue, and then pull out the one marker that was just clicked – and change its color to yellow. Here’s a look at that code.
google.maps.event.addListener(marker, 'click', function() {
	document.getElementById("map-story").innerHTML = $marker.html();
	map.markers.forEach(function(marker){
		marker.setIcon('https://www.allianceforthebay.org/wp-content/themes/acb/img/marker-blue.png');
	});
	marker.setIcon('https://www.allianceforthebay.org/wp-content/themes/acb/img/marker-yellow.png');
});
Our array, markers, contains all of the markers currently on the map. We loop through that array, set every marker to use the blue version, and then take the one marker where we just “heard” the click, and use setIcon to changes its color.
Have Google Maps or web development question you need help with? Reach out and we’ll do our best to respond.
About Jason Unger
Jason Unger is the Founder of Digital Ink. He built his first website on Geocities, and hasn't looked back since. Digital Ink tells stories for forward-thinking businesses, mission-driven organizations, and marketing and technology agencies in need of a creative and digital partner.
Other Stories You May Like